

第一步:XMiR-Patcher脚本解锁路由器SSH
https://github.com/openwrt-xiaomi/xmir-patcher
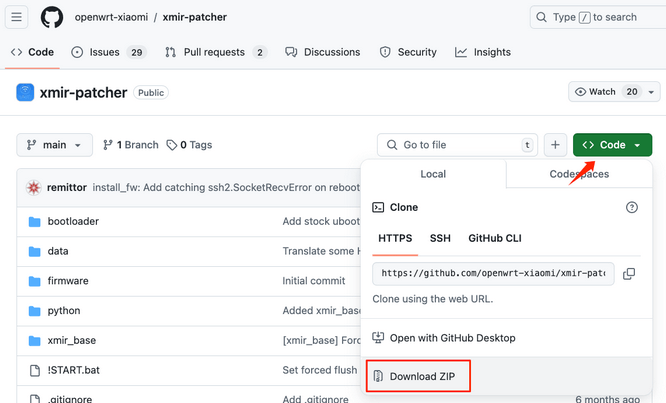
打开Github仓库直接打包下载脚本。
")
下载完成后解压,运行run.bat,确认目前路由器地址是否为192.168.1.1,如不同则进行按“1”进行修改。
")
按“2”继续进行破解,期间需要输入路由器的登录密码。
")
等待3分钟左右,出现这个提示代表SSH开启成功了,输入0退出即可,SSH默认密码12345678
第二步:刷入分区文件+UBoot
SSH登录路由器,下载Uboot以及分区文件:
curl -o /tmp/MIBIB.bin https://mao.fan/shezhang/RedmiAX3000/MIBIB.bin
curl -o /tmp/APPSBL.bin https://mao.fan/shezhang/RedmiAX3000/APPSBL.bin
curl -o /tmp/APPSBL1.bin https://mao.fan/shezhang/RedmiAX3000/APPSBL1.bin
写入对应分区:
mtd write /tmp/MIBIB.bin /dev/mtd1
mtd write /tmp/APPSBL.bin /dev/mtd11
mtd write /tmp/APPSBL1.bin /dev/mtd12
注意!完成后不要重启路由器,因为分区已经被清空,接下来需要刷入OpenWrt系统。
第三步:刷入Openwrt固件
红米AX3000固件项目地址:
https://github.com/hzyitc/openwrt-redmi-ax3000
复制以下内容,在路由器内另存为123.sh脚本文件,记得chmod+x赋予执行权限,然后执行即可。
cd /tmp
wget https://github.com/hzyitc/openwrt-redmi-ax3000/releases/latest/download/openwrt-ipq50xx-arm-redmi_ax3000-squashfs-nand-factory.ubi

# Check your partition table
cat /proc/mtd
[[ "$(grep '"rootfs"' /proc/mtd | cut -d':' -f1)" == "mtd18" ]] || exit
[[ "$(grep '"rootfs_1"' /proc/mtd | cut -d':' -f1)" == "mtd19" ]] || exit

# Detect the current system slot and flash into the other one
cat /proc/cmdline
mtd="$(grep -oE 'ubi.mtd=[a-zA-Z0-9\-\_]*' /proc/cmdline | cut -d'=' -f2)"
if [[ "$mtd" == "rootfs" ]]; then
# Flash it as system 2
ubiformat /dev/mtd19 -f openwrt-ipq50xx-arm-redmi_ax3000-squashfs-nand-factory.ubi
nvram set flag_try_sys2_failed=0
nvram set flag_boot_rootfs=1
nvram set flag_last_success=1
nvram commit
elif [[ "$mtd" == "rootfs_1" ]]; then
# Flash it as system 1
ubiformat /dev/mtd18 -f openwrt-ipq50xx-arm-redmi_ax3000-squashfs-nand-factory.ubi
nvram set flag_try_sys1_failed=0
nvram set flag_boot_rootfs=0
nvram set flag_last_success=0
nvram commit
fi

# Reboot
reboot
脚本执行完成后路由器会自动重启,路由器重启完成后进入192.168.1.1 用户名:root 密码:为空
这个是原生的系统,默认是英文,需要在软件管理中手动安装中文语言包。
第四步:Uboot的使用
顶住Rest按键,通电10秒,输入192.168.10.1即可进入Uboot界面,后续升级系统可以在这里操作。
第五步:建议以及备份的opkg源
虽然已经2025年了,但还是不建议刷最新版的,比如23版本依旧存在网速会慢的问题,作者在源码主页也强调了是因为不支持qsdk加速的原因。要网速好就用旧版21版5.4内核。
备份的opkg源,避免后期误操作。
src/gz openwrt_core https://hzyitc.github.io/openwrt-redmi-ax3000/ipq50xx-qsdk-kernel-5.4-openwrt-21.02-qsdk-11.5.05.841.1029/ci-20240727-173350-ab1f9ffa
src/gz openwrt_base https://mirrors.tuna.tsinghua.edu.cn/openwrt/releases/21.02.7/packages/arm_cortex-a7_neon-vfpv4/base
src/gz openwrt_luci https://mirrors.tuna.tsinghua.edu.cn/openwrt/releases/21.02.7/packages/arm_cortex-a7_neon-vfpv4/luci
src/gz openwrt_packages https://mirrors.tuna.tsinghua.edu.cn/openwrt/releases/21.02.7/packages/arm_cortex-a7_neon-vfpv4/packages
src/gz openwrt_routing https://mirrors.tuna.tsinghua.edu.cn/openwrt/releases/21.02.7/packages/arm_cortex-a7_neon-vfpv4/routing
src/gz openwrt_telephony https://mirrors.tuna.tsinghua.edu.cn/openwrt/releases/21.02.7/packages/arm_cortex-a7_neon-vfpv4/telephony
至于为什么IPQ50xx是Cortex-A53,但本固件显示架构A7,因为256M不够运行64位系统。openwrt没有32位a53的软件源。所以32位版本用了a7的软件源。